


Fingers with Phil Part 1: Finger Strength Training for Beginners
Greetings climber! Welcome to Fingers with Phil! My name is Phil, and I am here to give you the tips and tricks to get strong fingers like my crew and me. It’s no question that your fingers take on a massive load when climbing. Mine sure do! That is especially true once your strength and movement on the wall improve exponentially in those first few months of climbing regularly. As you progress up the grade range, the holds get smaller, and you will need to rely on your precious finger tendons and pulleys more and more. Training your finger strength with intention can have massive benefits to your climbing by increasing the level you climb at (DUH!) and preventing injury. Sometimes finger training can take a bit longer than expected, but it’s important work! Stick with me, and you’ll be crushing your crimp projects in no time! Wait, what time is it? Okay, I ran a little over on this intro, but I promise you’ll be crushing soon!
Are you ready to start training finger strength?
Have you plateaued?
Finger training isn’t for everyone! Be patient. It takes time! Before jumping on the hangboard without much thought, take some time to figure out if you are ready to start training finger strength. The first question to ask yourself is, has your climbing performance been plateauing for an extended period (4+ months) despite consistent hours in the gym? If not, and your climbing performance has been trending upward for the past few months, it might not be the best time to integrate a new training tactic into your regime. If you’re continuing to improve, keep doing what you’re doing! If you’ve found yourself in a shoe-throwing state of frustration at your climbing plateau, training finger strength may be the key to further success. I mean, I would assume. I’ve never actually owned a pair of shoes.
Is finger strength the component holding you back?
The hangboard is so idealized in the climbing world, and while it is beneficial in many circumstances, it is not always the answer to making you a better climber. Take some time to pinpoint what is holding you back from becoming the best climber you can be. The components in question are power, endurance, or strength. You can determine which factors are holding you back by asking yourself a few questions and reflecting on WHY you are falling off the wall. When making a big deadpoint at your maximum ability level, do you fall because you don’t feel like you can pull off the next hold? If yes, it could be your power that’s holding you back. Do you pump off the wall before anything else in your body fatigues? If yes, then it’s your endurance that could use some work. When landing a move onto a small hold, do you feel like you can’t possibly hold on to something so small? In that case, it’s most likely your finger strength that is the issue. Before diving into finger strength training, determine if finger strength is the component you would like to spend some time on. If so, let’s continue!
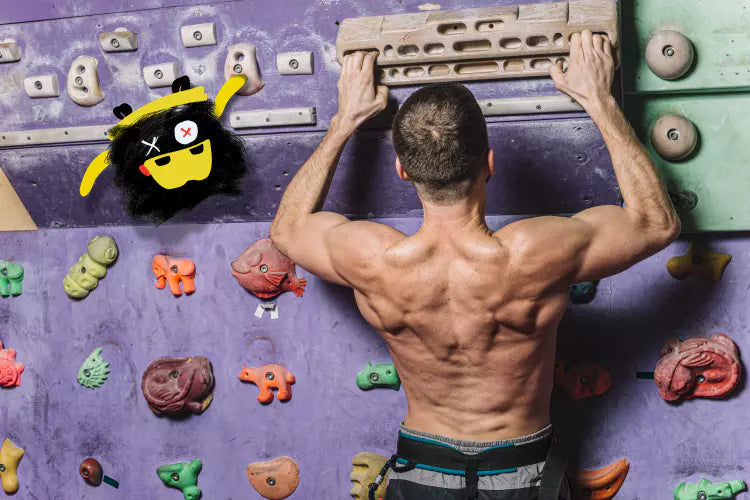
Nail down your hanging position
Before hanging on small edges, you want to make sure your hanging position is perfect, so you don’t injure your shoulders while training. Hanging out is more complicated than it looks! Your shoulders must be engaged the entire time you’re hanging. Go over to your gym’s hangboard or your at-home pull-up bar to test this. Grab onto some big, hefty jugs and hang. Are your arms right next to your ears? That might be a sign that you are hanging without your shoulders engaged. To fix this, try to squeeze your shoulder blades (scapulas) together while you are hanging. If you have the luxury of hanging in front of a mirror (or maybe recording yourself), your shoulders should not appear shrugged in your hanging position. Can you hang with your shoulders engaged with no problem? Then you have an excellent hanging position to begin hanging from smaller edges. If you find yourself shaking or struggling to hang with your shoulders engaged after only 15 seconds, you will want to strengthen your hanging position before hopping on smaller edges.
Crimping position
Now that you’ve nailed down your hanging position let’s master your crimping positions. There are three different ways to crimp, ranging from the lowest to the highest load placed on your tendons. The first is an open hand crimp. The open hand is when all four fingers have both finger joints in flexion. In other words, everything is straight as an arrow! The second is a half crimp position. The half crimp is when all four fingers have the proximal joint (the middle joint in your finger) at a 90-degree angle. And the last is the full crimp. The full crimp is hyperextension of the distal finger joints, sometimes with a thumb lock over the crimping fingers. That is any crimp past 90 degrees.
The open hand position puts the least stress on your finger joints, while the full crimp puts the most pressure on your finger joints. If you ask individuals who have suffered a finger injury, more likely than not, they hurt it while in the full crimp position. The open hand position typically feels the weakest, while the full crimp usually feels the strongest and allows you to pull much harder. When training finger strength, always train in either the open hand or half crimp position. If you train these weaker crimping positions, your chances of injuring yourself while training will decrease, while all three crimping positions get stronger. It’s a win-win!
While full crimping is the most dangerous, it’s essential to realize that it’s okay to full crimp when you need it. You want to have a solid full crimp position in your back pocket if you ever need to whip it out for a few moves to send your project.
Alright, that’s all we have time for today. I know it’s dark out, but I will take one last headlamp burn on my project. Would you mind giving me a catch? Join me next time to talk about injury prevention and specific finger training workouts!